How To Setup Free Zoho Email Hosting With Your Own Custom Domain
In this article we will be talking about how to setup free Zoho email hosting with your own domain. After going through this whole article you should be able to get your own free business email address.
Before we start you should know that some things are required to setup your email on zoho. They are as follow:


Before we start you should know that some things are required to setup your email on zoho. They are as follow:
- A domain name
- Access to DNS Manager of that domain
You are going to setup a custom domain email so you surely do need a domain name and also the access to DNS manager of that domain. We will need to add some DNS records in order to get a working email address. I am using Cloudflare to manage DNS on this article.
Now that you have got these things, lets get your business email account.
First of all we will need a free Zoho account. If you already have one proceed with that else create a new one. To create a new Zoho account for email hosting just follow this link.
Click here to signup Zoho Email Hosting SignUp
After opening this link, a page will load like this,

Now select the Business Email Option and then Signup.
On Next page you will be asked to select your plan. Scroll down to that point from where you can select free plan, just like in the image below,

Now get start with the free plan and After that you will get a form like in below image, fill it up and then click next,

Form field details:
- Signup With A Domain I Already Own: enter your domain here which you want an email on
- Name: Put your name
- Administrator Account: Put an email you want to create (support@yourdomain.com)
- Phone: Enter your phone and verify on next step
- Password: Create a password for your Zoho account
Now, on the next page you will be asked to verify you phone number through SMS.
After verifying your phone, you will be redirected to domain verification and email setup.

Select your DNS manager to verify domain ownership, in my case i am using cloudflare so it will be 'Others'. Now you will be given some DNS records, head to your DNS manager and add them.
Add the records according to your DNS manager like in the image below,
Select the record type as 'CNAME' and enter other entries as you are given.

After that click on 'Proceed to CNAME verification' button. It will take some time for DNS propagation so you will have to wait some time before it gets verified. But if you change the TTL (Time to Live) to the minimum it accepts (in my case, its 2 mins) it should be instant and you will get to next step.
On next step you will be asked/confirm your new email address, just leave it as it is if you are happy or change as per your desires.

After that just skip the Add Users & Create Groups Step and go to Configure Email Delivery Step.
Now again we will add some records named 'MX Records' on your DNS manager.

Select the record type as 'MX' and input the records as you are provided, see the image below

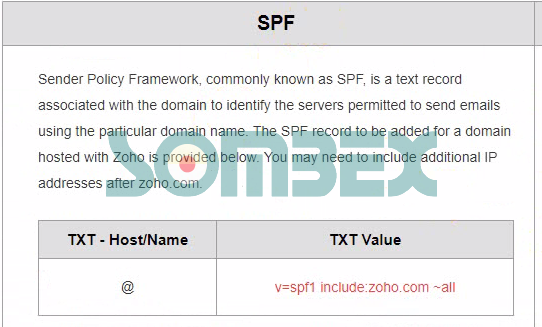
After that, click on next and again we will add more records named SPF/DKIM.
Add a new record as 'TXT' and input the given values,

Now lets add our DKIM Records, click on 'Proceed to configure DKIM ' button. Now your domain will be shown on the next page, on the right side click on the 'Edit' button under 'Action' column. On next step click on 'Add selector' button and enter a random word as 'Selector Name' and save it.
See below image,
 After saving the selector, we will get our last DNS record to add, ie; DKIM. Lets add it from our DNS manager.

Again, create a new record as 'TXT' type and enter value as you are given. After that click on verify button to verify our DKIM record. Now we are almost done configuring our email hosting.

Now, you can safely skip the last three steps, just click on 'Skip' button for 'Email Migration' , 'Email Client Configuration' & 'Mobile Access'.
And that's all Folks.
You can access your email from Here and manage your Zoho account form Here.
Read Also: Setting up Free Email Hosting with Migadu (Best Zoho Alternative)
Here is a video tutorial for zoho email hositng setup,
And this guide ends here, if you have any issues following this article just comment below, we would love to help and hear form you. Have a nice day..:)
Add a new record as 'TXT' and input the given values,
Below is a image after adding the above records on DNS manager.

Now lets add our DKIM Records, click on 'Proceed to configure DKIM ' button. Now your domain will be shown on the next page, on the right side click on the 'Edit' button under 'Action' column. On next step click on 'Add selector' button and enter a random word as 'Selector Name' and save it.
See below image,


Again, create a new record as 'TXT' type and enter value as you are given. After that click on verify button to verify our DKIM record. Now we are almost done configuring our email hosting.

Now, you can safely skip the last three steps, just click on 'Skip' button for 'Email Migration' , 'Email Client Configuration' & 'Mobile Access'.
And that's all Folks.
You can access your email from Here and manage your Zoho account form Here.
Read Also: Setting up Free Email Hosting with Migadu (Best Zoho Alternative)
Here is a video tutorial for zoho email hositng setup,
And this guide ends here, if you have any issues following this article just comment below, we would love to help and hear form you. Have a nice day..:)
Appropriately, earlier o choosing to pick a web have you should examine into the various advancements of each one and decide whether they will address the issues to your future website. https://onohosting.com/
ReplyDeleteAwesome article, but it is all useless for readers who visit only to reading useful data that can be helpful to their general knowledge. I think it is time wasting for me and my Dissertation Editing service
ReplyDeleteExcellent guide on creating free Zoho email hosting with your custom domain! Detailed step-by-step tutorials like these are always useful. In a way, I have often found myself using such productivity tools to keep track of tasks while things get hectic academically. Well, some days when things get too much, I actually hire support services to do my exam for me. Thank you for this valuable content; definitely bookmarking it for further setups!
ReplyDeleteThis was an excellent and insightful guide on setting up free Zoho email hosting with a custom domain! Tutorials like these are incredibly helpful for streamlining workflows and staying organized. While managing tight academic schedules, I’ve realized how important it is to delegate certain responsibilities — especially tasks like ensuring a professional security service london residents can rely on. Thanks for sharing such practical and well-structured content — I’m definitely saving this for future reference!
ReplyDeleteDo you like electrical scooters? You can go to https://www.trottinette-electrique.pro/
ReplyDeleteThis guide explains how to set up free Zoho email hosting with your own custom domain, making communication more professional and organized. Clear steps help beginners follow easily. Reliable support matters in many fields, and a Professional essay writing service can also benefit from such structured and efficient email solutions.
ReplyDelete